Follow Me On Social Media!

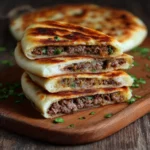
Chocolate Peanut Butter Bars That Are Irresistibly Indulgent
Introduction to Chocolate Peanut Butter Bars
There’s something magical about the combination of chocolate and peanut butter that takes dessert to an entirely new level. Chocolate peanut butter bars are not just a sweet treat—they’re a moment of nostalgia that transports you back to childhood when every snack was an adventure and every bite was savored. Imagine biting into a rich, creamy, and slightly crumbly bar that perfectly balances the sweetness of chocolate with the salty richness of peanut butter. It’s blissful, isn’t it?
These bars are more than just a delicious dessert; they’re incredibly easy to prepare, making them a perfect choice for busy young professionals who still want to indulge in a homemade treat without spending hours in the kitchen. Picture using just a handful of wholesome ingredients—many you probably already have on hand—to whip up a batch in under an hour. Whether you’re hosting friends for a game night or simply craving a sweet pick-me-up after a long day, chocolate peanut butter bars will reliably deliver that satisfying craving.
What makes Chocolate Peanut Butter Bars so irresistible?
There are several elements that make chocolate peanut butter bars so hard to resist:
-
Decadent Flavor Profile: The deep, rich chocolate mixed with creamy peanut butter creates an irresistible flavor combination that’s universally loved. It’s the comforting hug of dessert you didn’t know you needed.
-
Texture Variety: The contrast between the smooth chocolate layer and the slightly crumbly peanut butter base offers a delightful multi-sensory experience. One bite will have you hooked, thanks to the delightful crunch that underscores a velvety mouthfeel.
-
Easy to Personalize: Feel free to experiment! Add a sprinkle of sea salt on top or mix in some crushed pretzels or nuts for an extra crunch. The adaptability of these bars allows for endless creativity.
-
Nostalgic Comfort Food: For many, chocolate peanut butter bars stir feelings of nostalgia, reminding us of simpler times—like baking with family on a Sunday afternoon or enjoying a snack after school.
This enticing dessert is not only easy to prepare but also invites creativity, making it a perfect choice to impress or unwind with. Get ready to discover how to make these delectable bars and reclaim a bit of that childhood joy!

Key Ingredients for Chocolate Peanut Butter Bars
Creating chocolate peanut butter bars at home isn’t just about combining ingredients; it’s about crafting a delicious experience. Whether it’s a late-night craving or a sweet treat for friends, the right ingredients can make all the difference. Here’s what you’ll need:
-
Peanut Butter: Natural, chunky peanut butter works wonders for texture and flavor, giving your bars that rich, savory kick. Smooth peanut butter can also be used if that’s your preference.
-
Cocoa Powder: Using unsweetened cocoa powder ensures that your bars are rich and chocolatey without any overwhelming sweetness. It’s the heart of your chocolate peanut butter bars.
-
Oats: I prefer rolled oats for their chewiness—they provide structure and a hearty quality that balances the creaminess of the peanut butter and chocolate.
-
Honey or Maple Syrup: This acts as a natural sweetener and binds the ingredients together beautifully. It adds a subtle depth that sugar simply can’t replicate.
-
Vanilla Extract: A splash of pure vanilla extract is essential for flavor; it accentuates the other ingredients, creating a harmonious blend.
These ingredients come together to create bars that are not just tasty but also nutritious. Enjoy the process of mixing these simple yet satisfying components, and you’ll soon have a delightful treat at your fingertips!
Why You’ll Love These Chocolate Peanut Butter Bars
When you dive into chocolate peanut butter bars, you’re not just enjoying a dessert; you’re indulging in a delightful blend of flavors that conjures memories of childhood treats and cozy evenings. The perfect balance of rich chocolate and creamy peanut butter creates a harmonious combination that feels like a warm hug on a plate.
There are several reasons these bars will quickly become a cherished favorite:
-
Simplicity: You don’t need to be a master baker to whip up these delicious bars. With just a handful of ingredients and straightforward steps, you’ll be on your way to a delectable treat in no time.
-
Versatility: Whether you’re making them for a casual movie night, a potluck, or just a treat for yourself, these bars fit any occasion. They can also be easily customized—add your favorite nuts or a sprinkle of sea salt on top for that extra touch.
-
Satisfying Crunch: The texture is where these chocolate peanut butter bars shine. The outer layer offers a satisfying crunch, giving way to a chewy, gooey center.
-
Chocolate Lovers Unite: If you’re a fan of chocolate (who isn’t?), these bars will hit the spot! The rich chocolate coating elevates the peanut butter flavor, creating a treat that will leave your friends begging for the recipe.
With every bite, you’ll discover why these chocolate peanut butter bars have a special place in the hearts of many. Treat yourself—you deserve it!

Tips for Making Perfect Chocolate Peanut Butter Bars
Crafting the ultimate chocolate peanut butter bars is more than just following a recipe; it’s an art form infused with love and a dash of creativity. Here are some key insights to elevate your bars from ordinary to extraordinary.
Choose Quality Ingredients
- Chocolate: Opt for high-quality dark or semi-sweet chocolate for a rich flavor. Your taste buds will thank you.
- Peanut Butter: Use creamy, natural peanut butter without added sugar or preservatives. This will ensure your bars are smooth and maintain that authentic peanut butter taste.
- Sweeteners: If you’re looking for an alternative to granulated sugar, consider using maple syrup or honey. They can add a delightful twist to the flavor profile.
Master the Layering Technique
Achieving the perfect layer of chocolate on top of your chocolate peanut butter bars is crucial. Let the peanut butter layer cool slightly before pouring the chocolate on top. This prevents mixing and maintains distinct layers for a visually appealing treat.
Chill for Optimal Texture
After assembling your bars, let them chill in the refrigerator for at least 2 hours. This not only firms them up but also makes slicing easier, ensuring you get those clean, professional-looking squares.
Allowing Flavors to Meld
If you’ve got the willpower, allow your bars to sit overnight after chilling. This extra time helps the flavors meld together, enhancing the overall taste experience when you take that first bite.
By following these tips, your chocolate peanut butter bars will undoubtedly become the star of your dessert table!
Time Details for Making Chocolate Peanut Butter Bars
Creating chocolate peanut butter bars is not only a delightful endeavor but also one that doesn’t take forever. Understanding the time needed for each step can make the process seamless and enjoyable!
Preparation Time
In just 20 minutes, you can have all the ingredients blended and ready for the next step. This is the fun part—mixing the chocolate and peanut butter together to create a luscious base.
Chilling Time
After preparation, allow your chocolate peanut butter bars to chill in the refrigerator for about 2 hours. This step is essential for setting the bars perfectly so they slice beautifully.
Total Time
Overall, you’ll spend approximately 2 hours and 20 minutes from start to finish. Simple and sweet, right? Get ready to enjoy a delicious treat that’s worth every minute!

Nutritional Information for Chocolate Peanut Butter Bars
Enjoying chocolate peanut butter bars is not just a delightful treat, but also a delicious way to snack smartly. Understanding the nutritional breakdown can help you indulge mindfully, so let’s explore what makes these bars both tasty and satisfying.
Calories
Each serving of these chocolate peanut butter bars packs approximately 180 calories. This can vary slightly based on specific brands and ingredient quantities, but it’s a guilt-free indulgence worth savoring.
Protein
You’ll find that these bars provide around 7 grams of protein per serving. This makes them a great post-workout snack or an energy-boosting pick-me-up during a busy day, helping to keep you fueled and focused.
Sodium
In terms of sodium, you can expect about 100 milligrams per serving. This is relatively low, making these chocolate peanut butter bars a heart-healthy choice compared to many other snack alternatives.
With a balanced nutritional profile, it’s no wonder these tasty treats have become a favorite for those seeking both flavor and nourishment!
FAQs about Chocolate Peanut Butter Bars
When you take that first bite of your homemade chocolate peanut butter bars, you want all your questions answered! Here’s a handy FAQ section to help you navigate common queries as you dive into this delicious recipe.
Can I use other types of nut butter?
Absolutely! While this recipe shines with creamy peanut butter, feel free to explore alternatives like almond butter or cashew butter. Just keep in mind that different nut butters may alter the flavor and texture slightly. For example, almond butter tends to be a bit thicker, which could result in denser bars. If you’re a fan of sunflower seed butter, it also works wonderfully for those with nut allergies, providing a unique twist.
How should I store these bars?
For the best preservation of flavor and texture, store your chocolate peanut butter bars in an airtight container. They’ll stay fresh at room temperature for about three days, but if you want to keep them longer, pop them in the fridge where they can last up to a week. For even longer storage, consider freezing them; they can maintain their taste for up to three months. Just make sure to separate layers with parchment paper to prevent sticking!
What’s the best way to make these bars vegan?
To make your chocolate peanut butter bars vegan-friendly, simply swap out the butter for coconut oil or a vegan butter substitute. Also, make sure to choose dairy-free chocolate for the topping. Many brands offer fantastic dairy-free options that melt beautifully, ensuring you won’t miss the creaminess at all. With these tweaks, you’ll have scrumptious bars that everyone can enjoy!
Conclusion on Chocolate Peanut Butter Bars
Indulging in chocolate peanut butter bars isn’t just about satisfying a sweet tooth; it’s a delightful experience that combines two beloved flavors in one bite. The creamy peanut butter perfectly complements the rich chocolate, offering a treat that’s both decadent and manageable. These bars are not only easy to prepare but also a hit for gatherings, making them a go-to recipe in any kitchen. So, whether you’re craving a snack or looking to impress friends, whip up a batch of these delicious bars! Trust me, their fantastic flavor will leave you—and anyone lucky enough to try them—wanting more.
Print
No-Bake Peanut Butter Chocolate Bars
- Total Time: 70 minutes
- Yield: 10 squares 1x
- Diet: Vegan
Description
These no-bake peanut butter chocolate bars are a delicious and healthy treat, featuring creamy peanut butter, Medjool dates, and a rich dark chocolate topping.
Ingredients
Scale
- 1 cup creamy natural drippy peanut butter (just peanuts + salt)
- ½ cup packed pitted Medjool dates (about 6–7 large pitted Medjool dates)
- ¾ cup old fashioned rolled oats, gluten free if desired
- 1 bar (3 ounces) dark chocolate (around 70%), dairy free if desired
- 1 tsp vanilla extract
- 1 tbsp chia seeds
- 1 tbsp flaxseed meal (or sub hemp seeds or leave out)
- to taste Maldon sea salt (for sprinkling)
Instructions
- Start by soaking the dates in warm water for about 10 minutes—this softens them up so they blend more easily with the peanut butter and oats. After soaking, drain them well.
- In a food processor, add the peanut butter, soaked dates, vanilla, chia seeds, and flaxseed. Pulse until everything is well combined and the dates are mostly smooth. It’s okay if there are a few small chunks—just not too many!
- Add in the oats and pulse a few more times until they’re incorporated into the mixture. You might need to scrape down the sides of the bowl a few times to make sure everything blends evenly.
- Line an 8½ x 4½ inch loaf pan with parchment paper, then press the mixture firmly into the bottom of the pan to form an even layer.
- To make the chocolate topping, melt the dark chocolate in a small saucepan over low heat, stirring until smooth. Pour the melted chocolate over the peanut butter layer and gently tilt the pan to evenly coat the top.
- Place the pan in the fridge for at least 1 hour to allow everything to set. Once firm, slice into 10 squares. If you’d like, sprinkle a little sea salt on top for an extra flavor boost!
- Store the bars in the fridge in a covered container—they’ll keep fresh for up to 2 weeks. You can also freeze them for up to 2 months for longer storage.
Notes
- For a nut-free version, you can substitute the peanut butter with sun butter.
- Feel free to experiment with different toppings, like shredded coconut or chopped nuts.
- Prep Time: 10 minutes
- Cook Time: 0 minutes
- Category: Dessert
- Method: no-bake
- Cuisine: American
Nutrition
- Serving Size: 1 square
- Calories: 150
- Sugar: 5g
- Sodium: 50mg
- Fat: 8g
- Saturated Fat: 2g
- Unsaturated Fat: 6g
- Trans Fat: 0g
- Carbohydrates: 18g
- Fiber: 3g
- Protein: 4g
- Cholesterol: 0mg